Xamarin.Forms.Android
This section will guide you through the implementation process of an Anyline Xamarin.Android Scan View Renderer for the Xamarin.Forms project, including configuration and handling scan results.
Setup
Add Anyline XamarinSDK.Droid via NuGet
To access the functionality of our SDK, simply right-click on your project, go to manage Nuget packages and search for "Anyline".
Select Anyline.Xamarin.SDK.Droid, install the latest available version, and accept the license agreement.
Set the minimum Android target
In the Application settings of your project, set the minimum version of your Android target to (at least) API level 21.
Add the necessary permissions and features
The scanning activity needs the following permissions and features:
-
Permissions
-
CAMERA -
VIBRATE -
NFC
-
-
Features
-
android.hardware.camera -
android.hardware.camera.flash -
android.hardware.camera.autofocus -
android.hardware.nfc
-
This is how you can add them to your AndroidManifest.xml in your Properties node:
<?xml version="1.0" encoding="utf-8"?>
<manifest xmlns:android="http://schemas.android.com/apk/res/android" android:versionCode="1" android:versionName="1.0" package="com.anyline.xamarin.examples" android:installLocation="auto">
	<uses-sdk android:minSdkVersion="21" android:targetSdkVersion="28" />
	<uses-permission android:name="android.permission.CAMERA" />
	<uses-permission android:name="android.permission.VIBRATE" />
	<uses-permission android:name="android.permission.NFC" />
	<uses-feature android:name="android.hardware.camera" />
	<uses-feature android:name="android.hardware.camera.flash"  android:required="false" />
	<uses-feature android:name="android.hardware.camera.autofocus" android:required="false" />
	<uses-feature android:name="android.hardware.nfc" android:required="false" />
	<application android:allowBackup="true" android:icon="@mipmap/ic_launcher" android:label="@string/app_name" android:roundIcon="@mipmap/ic_launcher_round" android:supportsRtl="true" android:theme="@style/AppTheme" android:largeHeap="true"></application>
</manifest>|
The NFC feature/permissions are only required when using the NFC scanning capability. |
Additionally, your app will have to ask the users for the permission to use the Camera. To do that, you can use a third-party library (such as the Xamarin.Essentials), or this code snippet in your OnCreate() method of your MainActivity to request the permission:
protected override void OnCreate(Bundle savedInstanceState)
{
	...

	int REQUEST_CAMERA = 0;

	if (ContextCompat.CheckSelfPermission(this, Android.Manifest.Permission.Camera) != Permission.Granted)
	{
		// Should we show an explanation?
		if (!ActivityCompat.ShouldShowRequestPermissionRationale(this, Android.Manifest.Permission.Camera))
		{
			// No explanation needed, we can request the permission.
			ActivityCompat.RequestPermissions(this, new string[] { Android.Manifest.Permission.Camera }, REQUEST_CAMERA);
		}
	}
	else
	{
		System.Diagnostics.Debug.WriteLine("Permission Granted!");
	}

	...
}|
Our Xamarin.Forms example app is using the Xamarin.Essentials library to request the camera permission as it provides this, and many more cross-platform functionalities, with the usage of a single library. |
|
Camera API & Hardware Acceleration
Since newer devices might use the Android Camera2 API, it’s important to make sure that hardware acceleration is enabled in the activity that implements Anyline.
This can be set as seen above through the AndroidManifest, but better yet it should be set directly in the C# code of the activity like so:
|
|
Dex Compiler
Starting from SDK 21, Anyline uses Java 8 which requires Xamarin.Android projects to be compiled using the "d8" Dex compiler.
To set this compiler, go to the project Properties and, under the "Android Options" tab, select the option "d8" in the Dex compiler.
If the option is not available on Visual Studio (older versions), you can also add the following line directly on the .csproj file for both Debug and Release groups:
|
Generate an Anyline License Key
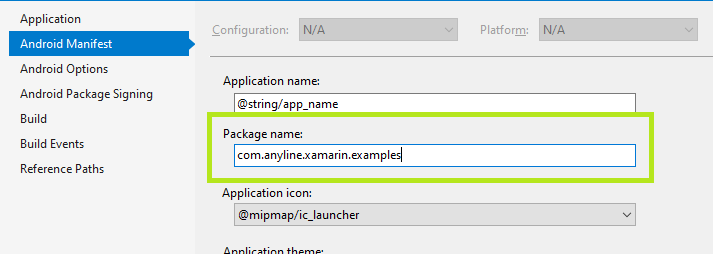
In order to run the Anyline SDK in your app, you require an Anyline License Key. To create a license key for your application, you have to identify the applicationId of your Xamarin.Android app.
|
License <> applicationId
Every license is bound to an |
Integrate the License Key
In order to integrate your generated license key, you can have the license key as string to your .cs code-behind of your scanning activity, or create a string resource under Resources\Values\strings.xml and reference it.
Initialize the SDK
In this step we will implement the service that will be called by the IAnylineSDKService in the Xamarin.Forms project. For this, create a new class in your Xamarin.Android called AnylineSDKService.cs:
using System;

[assembly: Xamarin.Forms.Dependency(typeof(Anyline.Droid.AnylineSDKService))]
namespace Anyline.Droid
{
	public class AnylineSDKService : IAnylineSDKService
	{
		public bool SetupWithLicenseKey(string licenseKey, out string licenseErrorMessage)
		{
			try
			{
				IO.Anyline2.AnylineSdk.Init(licenseKey, context: MainActivity.Instance);
				licenseErrorMessage = null;
				return true;
			}
			catch (Exception ex)
			{
				licenseErrorMessage = ex.Message;
				return false;
			}
		}
	}
}
As you may have noticed, a Context is necessary to initialize the Anyline SDK.
To retrieve this context you can use external packages (such as the CurrentActivityPlugin),
or a simple solution which consists of storing the MainActivity’s context in a static variable which can then be accessed by the AnylineSDKService, for example:
public class MainActivity : global::Xamarin.Forms.Platform.Android.FormsAppCompatActivity
{
	public static MainActivity Instance;

	protected override void OnCreate(Bundle savedInstanceState)
	{
		Instance = this;

		...
	}
}
Providing an Anyline Configuration to the Scan View
With the Anyline Configuration, you can define your whole use case, including scanning parameters and the look & feel of your scanning view.
The configuration parameters define the visual information presented to the user, as well as the scan settings (like the resolution, etc.) and feedback that is presented to the user.
Have a look at the Scanning Capabilities section for more specific implementation details.
You can adapt your scan view easily by adding a .json file as an asset to your project and loading it. In this example, we will create a .json file and configure it for the MRZ scanning.
Visual Studio
-
In your Assets treenode, right-click on the folder and select Add > New Item…
-
Choose Visual C# > Text File and name it
scanConfig.json
|
Build Action
Make sure that the build action for this file is set to AndroidAsset. |
Now open the file and paste the code from the following example:
{
	"cameraConfig": {
		"captureResolution": "1080p",
		"zoomGesture": true
	},
	"flashConfig": {
		"mode": "manual",
		"alignment": "top_left"
	},
	"viewPluginConfig": {
		"pluginConfig": {
			"id": "ID",
			"cancelOnResult": true,
			"mrzConfig": {
				"strictMode": false,
				"cropAndTransformID": false
			}
		},
		"cutoutConfig": {
			"style": "none",
			"maxWidthPercent": "90%",
			"maxHeightPercent": "90%",
			"alignment": "center",
			"ratioFromSize": {
				"width": 50,
				"height": 31
			},
			"cropPadding": {
			},
			"outerColor": "000000",
			"outerAlpha": 0.3,
			"strokeWidth": 2,
			"strokeColor": "0099FF",
			"cornerRadius": 4,
			"feedbackStrokeColor": "0099FF"
		},
		"scanFeedbackConfig": {
			"style": "rect",
			"visualFeedbackRedrawTimeout": 100,
			"strokeWidth": 2,
			"strokeColor": "0099FF",
			"fillColor": "220099FF",
			"beepOnResult": true,
			"vibrateOnResult": true,
			"blinkAnimationOnResult": false
		}
	}
}
This JSON builds the whole MRZ scanning use-case.
Adding the ScanPage Renderer
On the root of your Xamarin.Android project, add a new class and call it ScanPageRenderer.cs; under Resources > layout create a new Android Layout called ScanLayout.xaml. Use the folowing example code for each file:
using Android.App;
using Android.Content;
using Android.Content.Res;
using Android.Graphics;
using Android.Runtime;
using Android.Views;
using Android.Widget;
using Anyline;
using Anyline.Droid;
using IO.Anyline.Models;
using IO.Anyline.Plugin;
using IO.Anyline.Plugin.ID;
using IO.Anyline2;
using IO.Anyline2.View;
using System;
using System.Collections.Generic;
using System.IO;
using System.Linq;
using Xamarin.Forms;
using Xamarin.Forms.Platform.Android;

[assembly: ExportRenderer(typeof(ScanExamplePage), typeof(ScanPageRenderer))]

namespace Anyline.Droid
{
    public class ScanPageRenderer : PageRenderer, IEvent
    {
        private Android.Views.View view;
        private ScanView scanView;

        public ScanPageRenderer(Context context) : base(context)
        {

        }

        protected override void OnElementChanged(ElementChangedEventArgs<Page> args)
        {
            base.OnElementChanged(args);

            if (args.OldElement != null || Element == null)
            {
                return;
            }
        }

        protected override void OnAttachedToWindow()
        {
            base.OnAttachedToWindow();
            InitializeAnyline();
        }

        void InitializeAnyline()
        {
            try
            {
                if (view == null)
                {
                    var activity = Context as Activity;
                    view = activity.LayoutInflater.Inflate(Resource.Layout.ScanLayout, this, false);

                    AddView(view);

                    scanView = view.FindViewById<ScanView>(Resource.Id.scan_view);

                    scanView.Init("scanConfig.json");

                    scanView.ScanViewPlugin.ResultReceived = this;

                    scanView.CameraView.CameraOpened += ScanView_CameraOpened;
                }
            }
            catch (Exception e)
            {
                System.Diagnostics.Debug.WriteLine(e.Message);
                Toast.MakeText(Context, "Anyline Init Failed: " + e.Message, ToastLength.Long).Show();
            }
        }

		public void EventReceived(Java.Lang.Object data)
		{
			DisposeAnyline();

			var scanResult = (data as IO.Anyline2.ScanResult);

			var bitmap = scanResult.Image.Bitmap;
			MemoryStream stream = new MemoryStream();
			bitmap.Compress(Bitmap.CompressFormat.Jpeg, 100, stream);
			byte[] bitmapData = stream.ToArray();

			(Element as ScanExamplePage).ShowResultsAction?.Invoke(scanResult.PluginResult.ToString(), bitmapData);
		}

        private void ScanView_CameraOpened(object sender, IO.Anyline.Camera.CameraOpenedEventArgs e)
        {
            if (scanView != null)
                scanView.Start();
        }

        protected override void OnLayout(bool changed, int l, int t, int r, int b)
        {
            base.OnLayout(changed, l, t, r, b);

            var w = r - l;
            var h = b - t;

            var msw = MeasureSpec.MakeMeasureSpec(w, MeasureSpecMode.Exactly);
            var msh = MeasureSpec.MakeMeasureSpec(h, MeasureSpecMode.Exactly);
            view.Measure(msw, msh);
            view.Layout(0, 0, w, h);
        }

        protected override void OnConfigurationChanged(Configuration newConfig)
        {
            base.OnConfigurationChanged(newConfig);
            DisposeAnyline();
            InitializeAnyline();
        }

        protected override void Dispose(bool disposing)
        {
            DisposeAnyline();
            base.Dispose(disposing);
        }

        private void DisposeAnyline()
        {
            if (scanView != null)
            {
                scanView.Stop();
                scanView.CameraView.ReleaseCameraInBackground();
                scanView.Dispose();
                scanView = null;
            }
            view = null;
            RemoveAllViews();
        }
    }
}<?xml version="1.0" encoding="utf-8"?>
<RelativeLayout xmlns:android="http://schemas.android.com/apk/res/android"
android:orientation="vertical"
android:layout_width="match_parent"
android:layout_height="match_parent"
android:id="@+id/root_layout">
<io.anyline2.view.ScanView
android:id="@+id/scan_view"
android:layout_width="match_parent"
android:layout_height="match_parent"
android:layout_margin="3dp"/>
</RelativeLayout>That’s it!
Your Xamarin.Forms Android project is all setup and ready to scan! Select a device and start scanning MRZ strings. For more detailed information, check the full Xamarin.Android and the native Android SDK documentation.
In the next section we will implement the Xamarin.iOS renderer for our ScanPage.
Full Source Code
You can find the full source code on GitHub.
Open the solution in Visual Studio, build and deploy the application onto your Android device.
Reduce Final App Size
Check now the Reduce App Size to learn how to remove unnecessary assets and reduce the final app size.