Advanced Topics
This section covers additional topics regarding the Anyline React Native Plugin. You will not require knowledge about these advanced topics in your everyday use of the SDK. However, in case you need specific information about certain topics in the Anyline SDK, it will be covered here.
UI Configuration
The Anyline React Native wrapper offers you a way to optionally introduce some basic UI controls to your scan view, which can improve scanning experience.
To add these controls to your scan view, you can define an options node into the root of your JSON configuration containing instructions on how these controls appear.
iOS UI elements
The following controls are available on iOS: Done Button, Segment Control, and Label. As an example on iOS:
scanMode segment control{
"licenseKey": "YOUR_LICENSE_KEY",
"options": {
"doneButtonConfig": {
"offset.y": -88
},
"segmentConfig": {
"titles": ["Universal", "DOT", "DOT-Strict"],
"modes": ["UNIVERSAL", "DOT", "DOT_STRICT"],
"offset.y": -24
}
},
"viewPluginConfig": {
"pluginConfig": {
"id": "TIRE",
"cancelOnResult": true,
"tinConfig": {
"scanMode": "UNIVERSAL"
}
}
}
}OK Button
The OK button is a button that dismisses the scan view screen when pressed. The button is present even when not explicitly included in the configuration. However, you can modify its appearance further by specifying a few properties (i.e. doneButtonConfig) in your config:
| Key | Value |
|---|---|
|
The text displayed for the button |
|
A hex string denoting the color of the button title |
|
A hex string denoting the color used by the button title when pressed |
|
Size of the button title |
|
Name of the font (note: the font must be available for the device) |
|
Should be "LEFT", "RIGHT", or "CENTER" (the default), defining preset locations for the button along the x-axis. |
|
Should be "TOP", "CENTER", or "BOTTOM" (the default), defining preset locations for the button along the y-axis. |
|
A hex string indicating the color of the button background. The default is empty (clear color). |
|
Indicate whether the button should fill the width of the screen ("FULLWIDTH"), or simply fit the button text ("RECT", the default) |
|
Float indicating the corner rounding of the OK button. Default 0. |
|
Float value further adjusting the (x-)position of the button |
|
Float value further adjusting the (y-)position of the button |
Segment Control
If the plugin has support for different scan modes (currently, this is the case only for the following plugins: meter, license plate, OCR, container, and TIN), you can add a segment control that allows you to easily switch between said scan modes by adding a segmentConfig node to options.
If it appears, the segment control will by default be located at the bottom of the scan view, and centered horizontally within it.
|
The control is only added if the config meets the following requirements:
Please check Plugin Configuration Parameters for more information. |
| Key | Value |
|---|---|
|
an array of scan mode strings (that are valid for the plugin) in this configuration |
|
an array of user visible strings corresponding to the modes list. |
|
a color, denoted by a hex string, applied to the segment control (at least on iOS) |
|
Float value further adjusting the (x-)position of the segment control |
|
Float value further adjusting the (y-)position of the segment control |
Label
Finally, a static text label can be added to the scan view (useful when positioned next to the scan cutout, as a guide). Configure it with the labelConfig node.
| The label is only shown when configured. By default, if it is displayed, it appears directly above the cutout box in the scan view. |
| Key | Value |
|---|---|
|
the text to display |
|
a hex string denoting the color the label is to be displayed in |
|
the font size of the label |
|
Float value further adjusting the (x-)position of the label |
|
Float value further adjusting the (y-)position of the label |
Android UI elements
|
Some of the previous UI elements have been deprecated in version 51.4.0 and replaced by a new implementation. If you use one of the [Instruction Label, Cutout Image, or Feedback] elements please consider migrating to new UI Feedback config feature. Please note the deprecated UI elements are still present in the latest version and not yet removed to not break any existing implementation. If you are looking for the previous UI elements refer to UI Elements (deprecated). |
The following controls are available on Android: Default Orientation and Rotate Button. As an example on Android:
Default Orientation and Rotate Button user interface{
"licenseKey": "YOUR_LICENSE_KEY",
"options": {
"defaultOrientation": "landscape",
"rotateButton": {
"alignment": "top_left",
"offset": {
"x": 0,
"y": 0
}
}
},
"viewPluginConfig": {
"pluginConfig": {
"id": "TIRE",
"cancelOnResult": true,
"tinConfig": {
"scanMode": "DOT",
"upsideDownMode": "AUTO"
}
}
}
}Default Orientation
You can specify the default orientation that the scan screen should have when entering the screen. During the scan process you can only change the orientation, if you also added the Rotate Button to the JSON config.
| Key | Value |
|---|---|
|
The orientation of the screen, either |
|
If this attribute is not present, the orientation |
Rotate Button
The rotate button allows you to switch the orientation of the scan screen from portrait to landscape and vice versa.
| Key | Element | Value |
|---|---|---|
|
(none) |
Positioning of the button on the scan screen (one of |
|
|
Integer value further adjusting the (x-)position of the rotate button |
|
|
Integer value further adjusting the (y-)position of the rotate button |
NFC Passport Reading Support for iOS
|
For now, our NFC scanning functionality is only currently available for iOS (Android support will be added in the future). In addition, a minimum version of iOS 13 is required. |
If you would like to use the MRZ+NFC use case, make sure to configure an MRZ plugin and set the enableNFCWithMRZ option flag to true, as follows:
"options": {
    "enableNFCWithMRZ": true,
    ...
},
"viewPluginConfig": {
    "pluginConfig": {
        "id": "ID_NFC",
        "mrzConfig": {
            "strictMode": false,
            // ... add other mrzConfig parameters here
        }
    },
    // add your cutout and feedback config here
}
Besides the scan plugin config, you also have to add the following items to your app project’s info.plist file (these are required in order to tell the OS that the app can be allowed to access NFC functionality):
| Key | Value |
|---|---|
Privacy - NFC Scan Usage Description |
A non-empty string describing how the app is using NFC, to be presented to the user as a prompt (eg. "Please allow NFC access to read passports") |
ISO7816 application identifiers for NFC Tag Reader Session |
The list should include the string |
Finally, the "Near Field Communication Tag Reading" capability must also be added in the Xcode project’s Signing & Capabilities tab. The corresponding .entitlements file should look like as follows:
<?xml version="1.0" encoding="UTF-8"?>
<!DOCTYPE plist PUBLIC "-//Apple//DTD PLIST 1.0//EN" "http://www.apple.com/DTDs/PropertyList-1.0.dtd">
<plist version="1.0">
<dict>
  <key>com.apple.developer.nfc.readersession.formats</key>
  <array>
    <string>TAG</string>
    <string>NDEF</string>
  </array>
</dict>
</plist>Native barcode support
Native barcode detection can be enabled to run alongside an Anyline plugin, using the underlying platform’s barcode detection library. When a supported barcode is found, it will be returned alongside the Anyline plugin results.
A use case might be a Meter plugin that is configured to also look for common barcode formats associated with meter devices.
To enable native barcode support, add a nativeBarcodeScanningFormats property to your config’s option node and list
down the barcode formats that you would like to scan. Possible barcode format strings can found from the list of constants here.
Take note that simply because a constant exists for a barcode format in that list doesn’t imply that the device necessarily supports it. Commonly-supported types include: CODE_128, CODE_39, QR_CODE, AZTEC, DATA_MATRIX, PDF_417, UPC_E, CODABAR, EAN_13, EAN_8, and MICRO_QR.
|
{
    "licenseKey": "...",
    "options": {
        "nativeBarcodeScanningFormats": [ "AZTEC", "PDF417", "QRCODE" ],
    },
    "viewPluginConfig": {
        ...
    }
}
When the scan results are returned, the JSON string will include the node nativeBarcodesDetected:
{
    "meterResult": ...,
    "nativeBarcodesDetected": {
        [
            { "result": 480223447, "barcodeType": org.iso.Aztec }
        ]
    }
}
At the moment, native barcode scanning has a number of limitations :
-
You can only add native barcode scanning as part of an Anyline plugin configuration. Any native barcodes detected will be shown only when the main Anyline plugin has returned a result.
-
There is no feedback to let the user know that a barcode has been detected in this way.
-
Only the last native barcode result detected will be reported in the result screen.
-
As previously mentioned, some barcode formats may not be supported by the mobile platform running it.
-
The results are provided on a "best-effort" basis. Anyline does not guarantee the correctness or accuracy of the results returned from native barcode detection.
If the limitations make it hard to implement your use case, consider using the Anyline Barcode plugin, and potentially in a parallel composite setup together with another plugin.
Reducing SDK size
With the Anyline SDK integrated into your app, it is still possible to cut down on the total installable app size by identifying your Anyline use case, and using this to further optimize the app bundle delivered to users. An Anyline SDK bundle comes trained models for all supported use cases, a number of which your application may not require, and hence could be excluded from your build process.
These are the modules you will need for each technical capability:
| Technical capability | Module |
|---|---|
VIN |
|
Container |
|
OCR |
|
Barcode |
|
Meter |
|
MRZ |
|
Universal ID |
|
Japanese Landing Permission |
|
License Plate |
|
TIN |
|
Commercial Tire ID |
|
Tire Size |
|
| The steps you will need to take to accomplish this will be specific to each of the iOS and Android platforms. In case you are targeting both platforms, follow both the steps in iOS and Android as explicitly described in the following sections. |
iOS
By including a run script to the build phase of your application target such as the following, you can deliver a much-reduced overall app bundle size for your users. Depending on the use case you are targeting, the savings may be significant.
Add a Run Script build phase to your application’s target in your iOS .xcodeproj file with the following contents:
# --Available Modules--
DIR_BARCODE="module_barcode"
DIR_DOCUMENT="module_document"
DIR_METER="module_energy"
DIR_ID="module_id"
DIR_LICENSE_PLATE="module_license_plate"
DIR_OCR="module_anyline_ocr"
DIR_TIRE="module_tire"

MODULES_ARRAY=(${DIR_OCR} ${DIR_BARCODE} ${DIR_DOCUMENT} ${DIR_METER} ${DIR_ID} ${DIR_LICENSE_PLATE} ${DIR_TIRE})

# Identify any of the SDK modules from the list above that the app requires
# for example, ID and Meter, and set the MODULES_TO_KEEP_ARRAY accordingly:
# MODULES_TO_KEEP_ARRAY=( ${DIR_ID} ${DIR_METER} )
#
MODULES_TO_KEEP_ARRAY=( ${DIR_ID} ${DIR_METER} )

echo "Modules to include: ${MODULES_TO_KEEP_ARRAY[@]}"

FILENAME="AnylineResources.bundle"
MODULES_DIR_PATH=$(find "${CODESIGNING_FOLDER_PATH}" -iname ${FILENAME})
echo "Modules dir path: ${MODULES_DIR_PATH}"

if ((${#MODULES_TO_KEEP_ARRAY[@]})); then
    for module in "${MODULES_ARRAY[@]}"; do
        if [[ ! "${MODULES_TO_KEEP_ARRAY[*]}" =~ "${module}" ]]; then
            echo "Removing module ${module}"
            rm -rf "${MODULES_DIR_PATH}/${module}"
        fi
    done
fi
Define the MODULES_TO_KEEP_ARRAY variable accordingly for your use case. For example, if you know that your application
will only make use of the license plate and barcode plugins, put down:
MODULES_TO_KEEP_ARRAY=(${DIR_BARCODE} ${DIR_LICENSE_PLATE}).
| Ensure that this run script is the last Build Phase to be executed, and in particular, it must come after "[CP] Copy Pods Resources" (when present). |
| Regenerating the .xcworkspace file may result in this run script being removed. When doing so, re-add the run script, or consider a Cocoapods post-install hook to persist it in the project file. |
Android
For a guide on how to reduce the application size on Android please follow Reduce SDK Size.
Custom model files for OCR
Certain specialized use cases may call for the Anyline OCR plugin to be used with custom model files. These model files are specifically constructed to make possible the scanning of non-standard products: labels on bottlecaps, cattle tags, or voucher codes, to give a few examples.
To use these files with your Anyline plugin, they have to become part of your application binary. But rather than adding them as "asset" files into your React Native project, you must take distinct steps to accomplish this for both Android and iOS platforms.
iOS
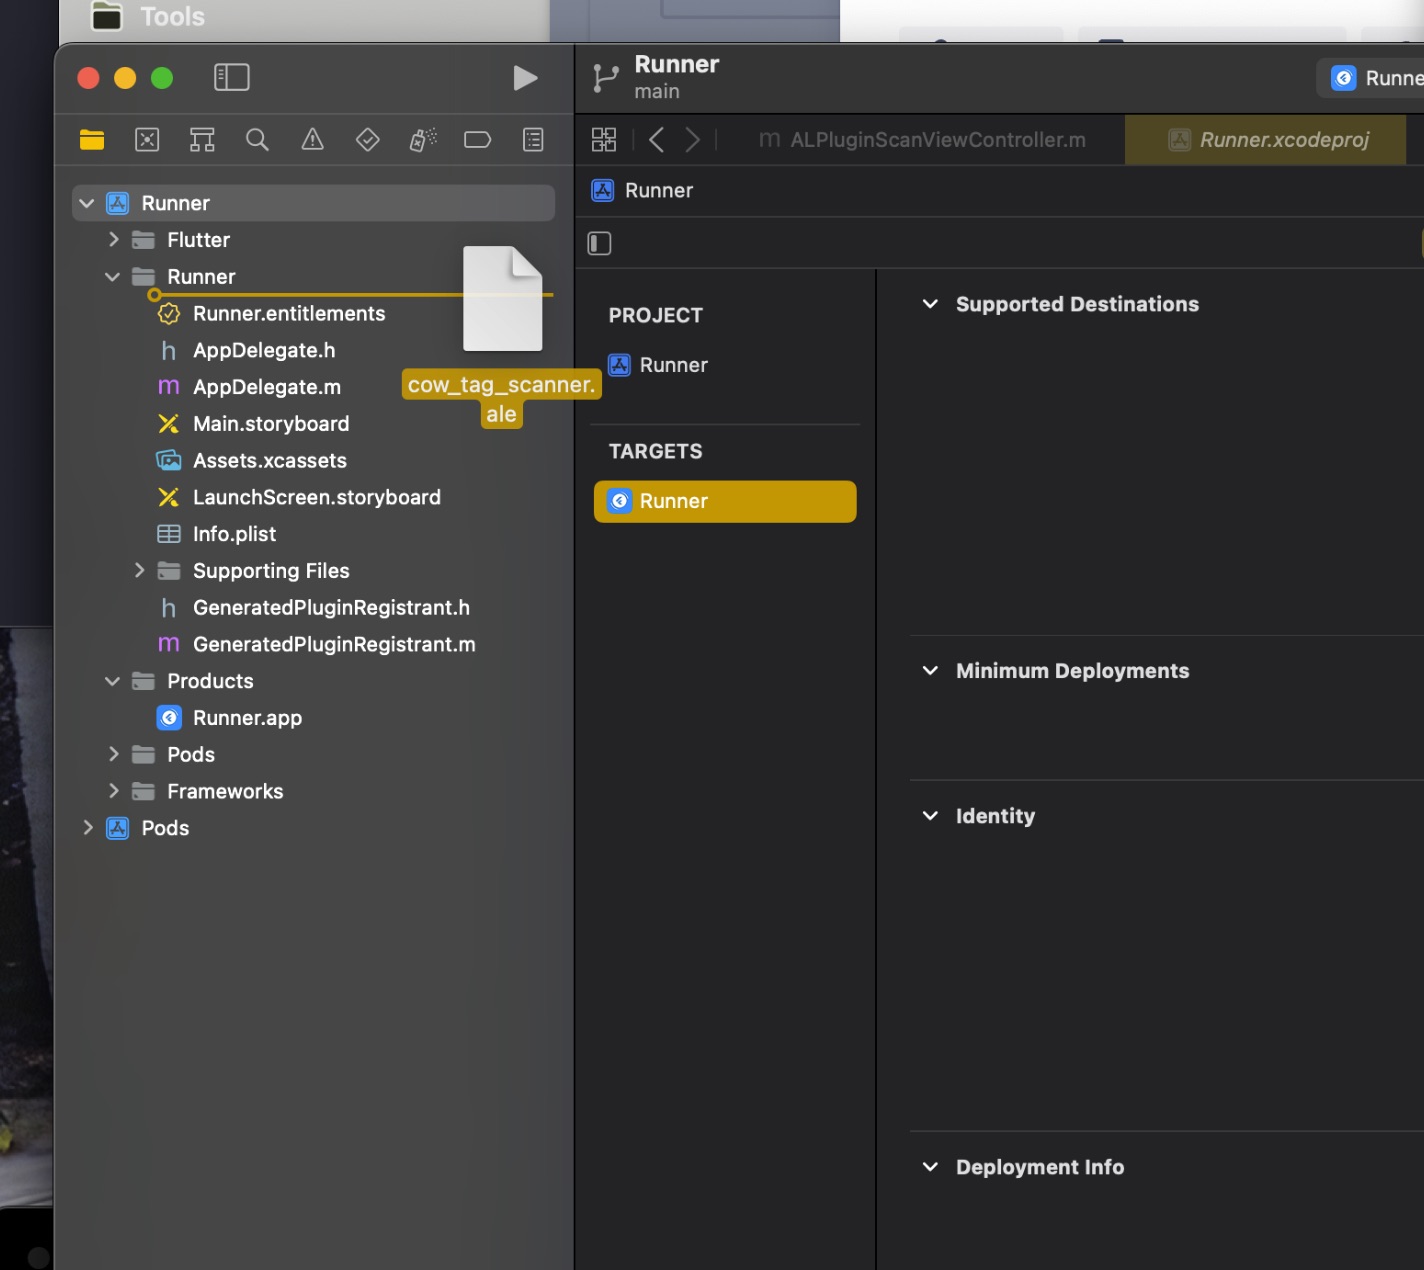
For iOS, what you need is the model files (consisting of .ale and .any files) to be added as files to the iOS application target on the Xcode project. Assuming the project name hasn’t been changed, the target to add this to would be would be in the Runner target in Runner.xcodeproj.
You can simply add your model file (here named cow_tag_scanner.ale) to the project by dragging it into the project navigator pane and selecting your iOS application as a target to add the file to.
Afterwards, your JSON configuration should reference said model file(s).
Android
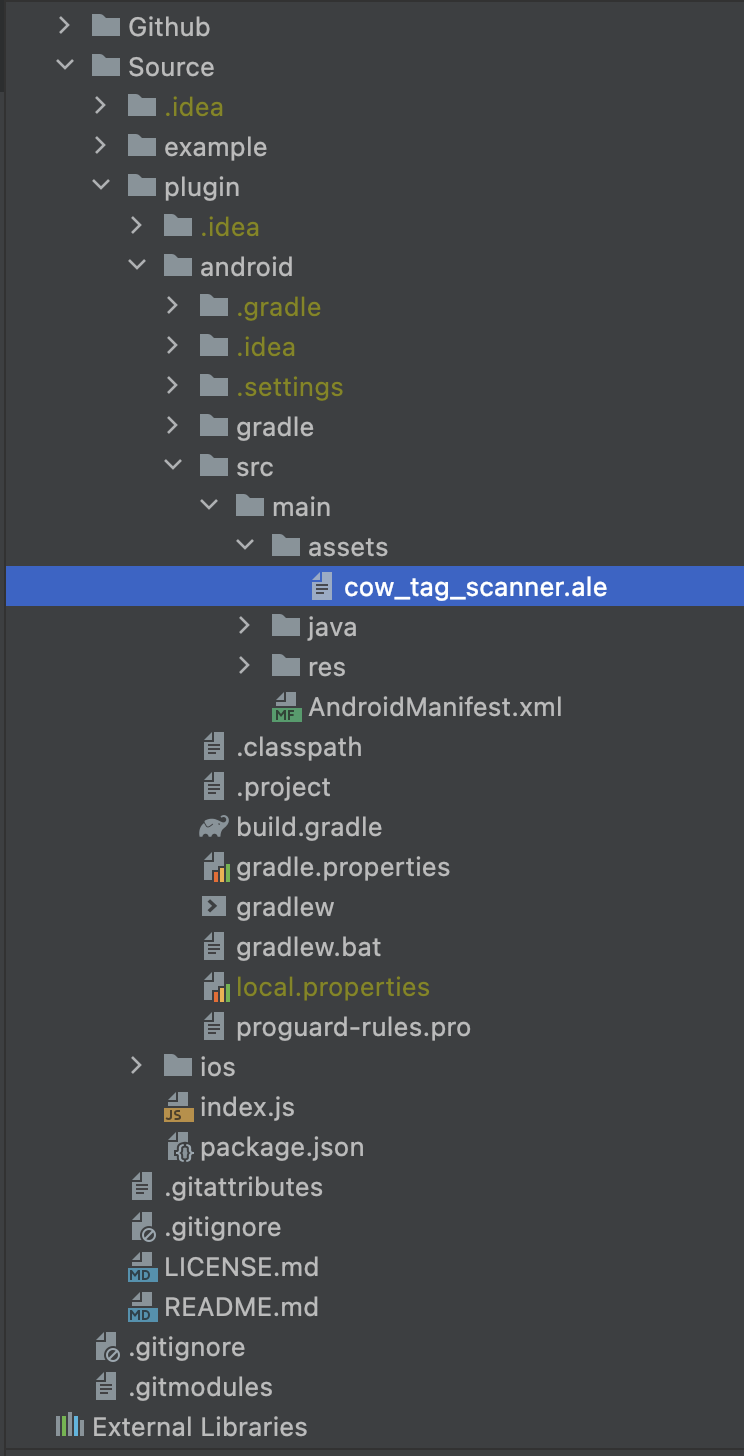
For Android, the model files (consisting of .ale and .any files) need to be added as files to the Android application assets folder.
You can simply add your model file (here named cow_tag_scanner.ale) to the project by dragging it into the project view.
JSON Configuration
Now, in order for the OCR plugin to use this file, explicitly reference the name of the file in the customCmdFile property of the ocrConfig:
"viewPluginConfig": {
  "pluginConfig": {
    "id": "cow-tag",
    "ocrConfig": {
      "customCmdFile": "cow_tag_scanner.ale"
    }
  },
  ...
}
If an .any file is also included as part of the custom CMD package, add it to the application in the same manner, and also provide its name through the model property within ocrConfig.
UI Feedback Config
UI feedback elements can enhance the scanning experience, by informing the user about environmental conditions detected during scanning. Incorporating such elements during the scanning experience can be beneficial in many ways. For example:
-
Incorporating visual cues (such as images or text) next to the cutout within the scan view can guide the user on how or what to scan.
-
Using sound cues can alert the user when certain conditions are detected that might impact optimal scanning (e.g. insufficient lighting, incorrect distance from object, etc.).
-
Configuring interactive visual elements that trigger predefined actions, such as an alert message box, can offer users more options to improve their scanning practices.
| At this time, UI Feedback Config is available for use with internal presets only. |
uiFeedbackConfig section{
"cameraConfig": {},
"flashConfig": {},
"viewPluginConfig": {
"pluginConfig": {},
"cutoutConfig": {},
"scanFeedbackConfig": {},
"uiFeedbackConfig": {
"presets": [
{
"presetName": "internal_preset_name",
"presetAttributes": [
{
"attributeName": "internal_preset_attribute1",
"attributeValue": "value_of_attribute1"
},
{
"attributeName": "internal_preset_attribute2",
"attributeValue": "value_of_attribute2"
}
]
}
]
}
}
}UI Feedback TIN preset
We have introduced a pre-configured UI Feedback preset designed to enhance the TIN scanning process, which includes:
-
A customizable cutout overlay guide image,
-
A customizable instruction label positioned above the cutout,
-
Configurable text, images, and sound alerts corresponding to various user conditions (such as brightness, distance, and content).
-
Android
-
iOS
To activate these features for TIN scanning, add the tin_custom_v1 preset to your TIN config, as shown in the following section.
TIN Preset usage sample
Below is a demonstration on how our tin_custom_v1 preset can be defined using a sample configuration object in JSON format. We suggest first utilizing this JSON configuration and making any necessary adaptations as needed.
{
  "cameraConfig": {},
  "flashConfig": {},
  "viewPluginConfig": {
    "pluginConfig": {
      "id": "tin",
      "cancelOnResult": true,
      "tinConfig": {
        "upsideDownMode": "AUTO"
      }
    },
    "cutoutConfig": {},
    "scanFeedbackConfig": {},
    "uiFeedbackConfig": {
      "presets": [
        {
          "presetName": "tin_custom_v1",
          "presetAttributes": [
            {
              "attributeName": "lighting_toodark_image",
              "attributeValue": "uifeedback_tin_toodark"
            },
            {
              "attributeName": "lighting_toobright_image",
              "attributeValue": "uifeedback_tin_toobright"
            },
            {
              "attributeName": "distance_moveback_image",
              "attributeValue": "uifeedback_tin_moveback"
            },
            {
              "attributeName": "distance_movecloser_image",
              "attributeValue": "uifeedback_tin_movecloser"
            },
            {
              "attributeName": "format_wrong_image",
              "attributeValue": "uifeedback_tin_wrongformat"
            },
            {
              "attributeName": "date_wrong_image",
              "attributeValue": "uifeedback_tin_wrongformat"
            },
            {
              "attributeName": "lighting_toodark_text",
              "attributeValue": ""
            },
            {
              "attributeName": "lighting_toobright_text",
              "attributeValue": ""
            },
            {
              "attributeName": "distance_moveback_text",
              "attributeValue": ""
            },
            {
              "attributeName": "distance_movecloser_text",
              "attributeValue": ""
            },
            {
              "attributeName": "format_wrong_text",
              "attributeValue": ""
            },
            {
              "attributeName": "date_wrong_text",
              "attributeValue": ""
            },
            {
              "attributeName": "lighting_toodark_sound",
              "attributeValue": "info_sound_TIN.wav"
            },
            {
              "attributeName": "lighting_toobright_sound",
              "attributeValue": "info_sound_TIN.wav"
            },
            {
              "attributeName": "distance_moveback_sound",
              "attributeValue": "info_sound_TIN.wav"
            },
            {
              "attributeName": "distance_movecloser_sound",
              "attributeValue": "info_sound_TIN.wav"
            },
            {
              "attributeName": "format_wrong_sound",
              "attributeValue": "info_sound_TIN.wav"
            },
            {
              "attributeName": "date_wrong_sound",
              "attributeValue": "info_sound_TIN.wav"
            }
          ]
        }
      ]
    }
  }
}
UI Feedback TIN preset attributes
Here is the list of attributes included with the tin_custom_v1 preset, including their descriptions.
| While we do offer a DOT overlay, please note that it is specifically designed for TINs with the DOT prefix used in countries like the United States. |
| Name | Type | Description |
|---|---|---|
|
Image |
Shown when the image is too dark to be processed. Used to advise the user to increase the lighting. |
|
Image |
Shown when there is too much light being received with the image. Used to advise the user to reduce the lighting. |
|
Image |
Shown when the contours detected are outside the boundaries of the cutout. Used to advise the user to increase distance from scan target. |
|
Image |
Shown when the contours detected are too small. Can be used to prompt user to decrease distance from scan target. |
|
Image |
Shown when a result format is different from what is expected. |
|
Image |
Shown when a result format is different from what is expected. |
|
String |
Text shown when the image is too dark to be processed. |
|
String |
Text shown when too much light is being received with the image. |
|
String |
Text shown when the contours detected are outside the boundaries of the cutout. |
|
String |
Text shown when the contours detected are too small. |
|
String |
Text shown when a result format is different from what is expected. |
|
String |
Text shown when a result format is different from what is expected. |
|
Sound file |
Sound played when the image is too dark to be processed. |
|
Sound file |
Sound played when too much light is being received with the image. |
|
Sound file |
Sound played when the contours detected are outside the boundaries of the cutout. |
|
Sound file |
Sound played when the contours detected are too small. |
|
Sound file |
Sound played when a result format is different from what is expected. |
|
Sound file |
Sound played when a result format is different from what is expected. |
If at runtime these assets cannot be located in either the application bundle or the SDK bundled assets, the asset will not be used. |
Bundled Assets
The following image assets, also shown on the above sample JSON, are included with the SDK bundle and can be used with your app by referencing these names within the tin_custom_v1 preset:
| Image | Name |
|---|---|
|
|

|
|

|
|

|
|

|
|

|
|
Apart from these assets, the sound file info_sound_TIN.wav is also included with the SDK.
|
Get help
If there is anything you are missing, you require support, or want to provide us with feedback, please reach out to us via https://support.anyline.com, where you either may find helpful information in our Knowledge Base or you can open a Support Ticket for more specific inquiries. In order to better assist you, please include any code of your Anyline integration and any ScanViewConfig you are using. |