Getting Started
|
Anyline iOS SDK version 43.0.0 is an SDK rewritten from the ground up, and features a wide range of performance and quality-of-life improvements. If you are looking for the previous version of Anyline, you can find version 42.3.0 on Github. |
Requirements
Anyline SDK supports iOS version 11.0 and later.
|
If you are migrating from an Anyline version lower than 43, please also see Migrating to Anyline 43.0.0.
The Anyline SDK Examples Bundle
If you prefer jumping into code rather than walking through a quick start guide, a good starting point for development with the Anyline SDK, is through the iOS SDK Examples Bundle on Github, which can be downloaded here.
It includes the following:
-
Framework: Contains the Anyline.framework and AnylineResources.bundle for version 50.0.3
-
Documentation: Contains HTML and docset versions with Appledoc-style interface documentation
-
AnylineExamples: Contains an example app where Anyline plugins are showcased under various configurations
-
LICENSE: Third-party license agreement
-
RELEASE_NOTES: Information about any new changes for the current release
Not included with the bundle are the Example Sheets with testing material. They can be downloaded here: Anyline Example Sheets
Quick Start Guide
This guide takes you through the first steps when implementing the Anyline SDK on your iOS application.
Add the Anyline SDK to your project
You can add the Anyline SDK to your iOS project in one of three ways:
With Cocoapods
Add the following line to your Podfile:
pod 'Anyline'and then run pod install or pod update (please make sure that you are on the latest version of CocoaPods).
With Swift Package Manager
Beginning with version 40, we are officially supporting Swift Package Manager.
| Xcode 11 or later is required. |
To use, click on File > Swift Packages > Add Package Dependency, and enter https://github.com/Anyline/anyline-ocr-spm-module.git in the search box.
Under Dependency Rules, select Up to Next Major Version and then specify 43.0.0 in the open field
next to it, and then click on Add Package.
If you are a framework author relying on Anyline SDK as a dependency, edit your Package.swift to add the dependency as follows:
dependencies: [
    .package(url: "https://github.com/Anyline/anyline-ocr-spm-module.git", .upToNextMajor(from: "50.0.3"))
]|
Swift Package URL
Please make sure that the URL is https://github.com/Anyline/anyline-ocr-spm-module.git, rather than https://github.com/Anyline/anyline-ocr-examples-ios.git. |
Local Copy
If you prefer to integrate Anyline without using a dependency manager, download the Examples bundle from our Github release page and extract the zip file. Inside you will find a Frameworks directory containing the .xcframework and .bundle files that you will use.
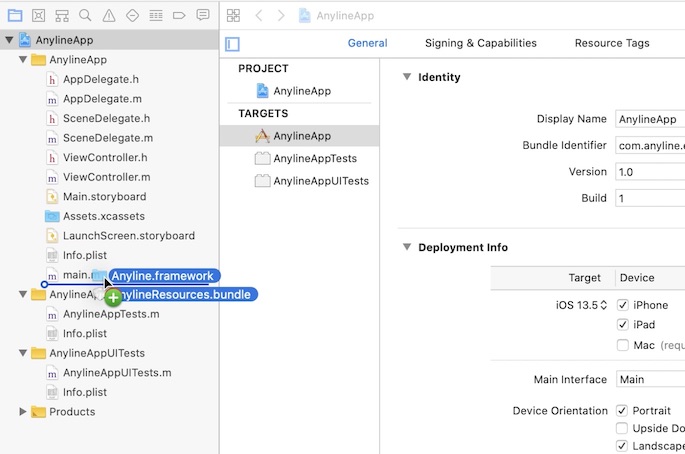
Simply drag & drop Anyline.framework (or Anyline.xcframework) and the AnylineResources.bundle into your project tree:
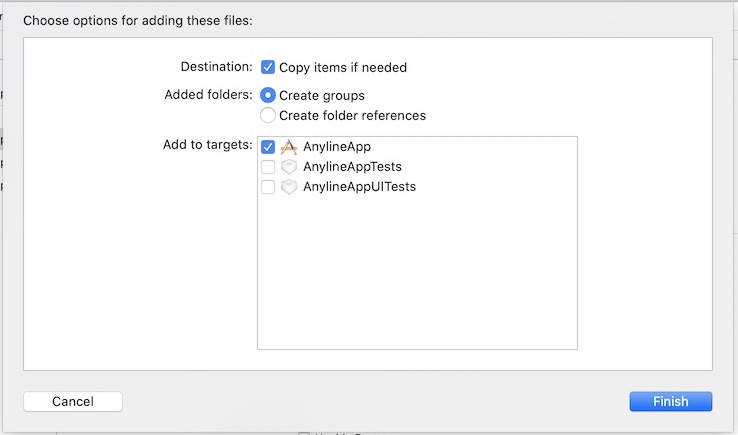
In the import files dialog, select Copy items if needed and Create groups and add the files to your target:
Link the frameworks
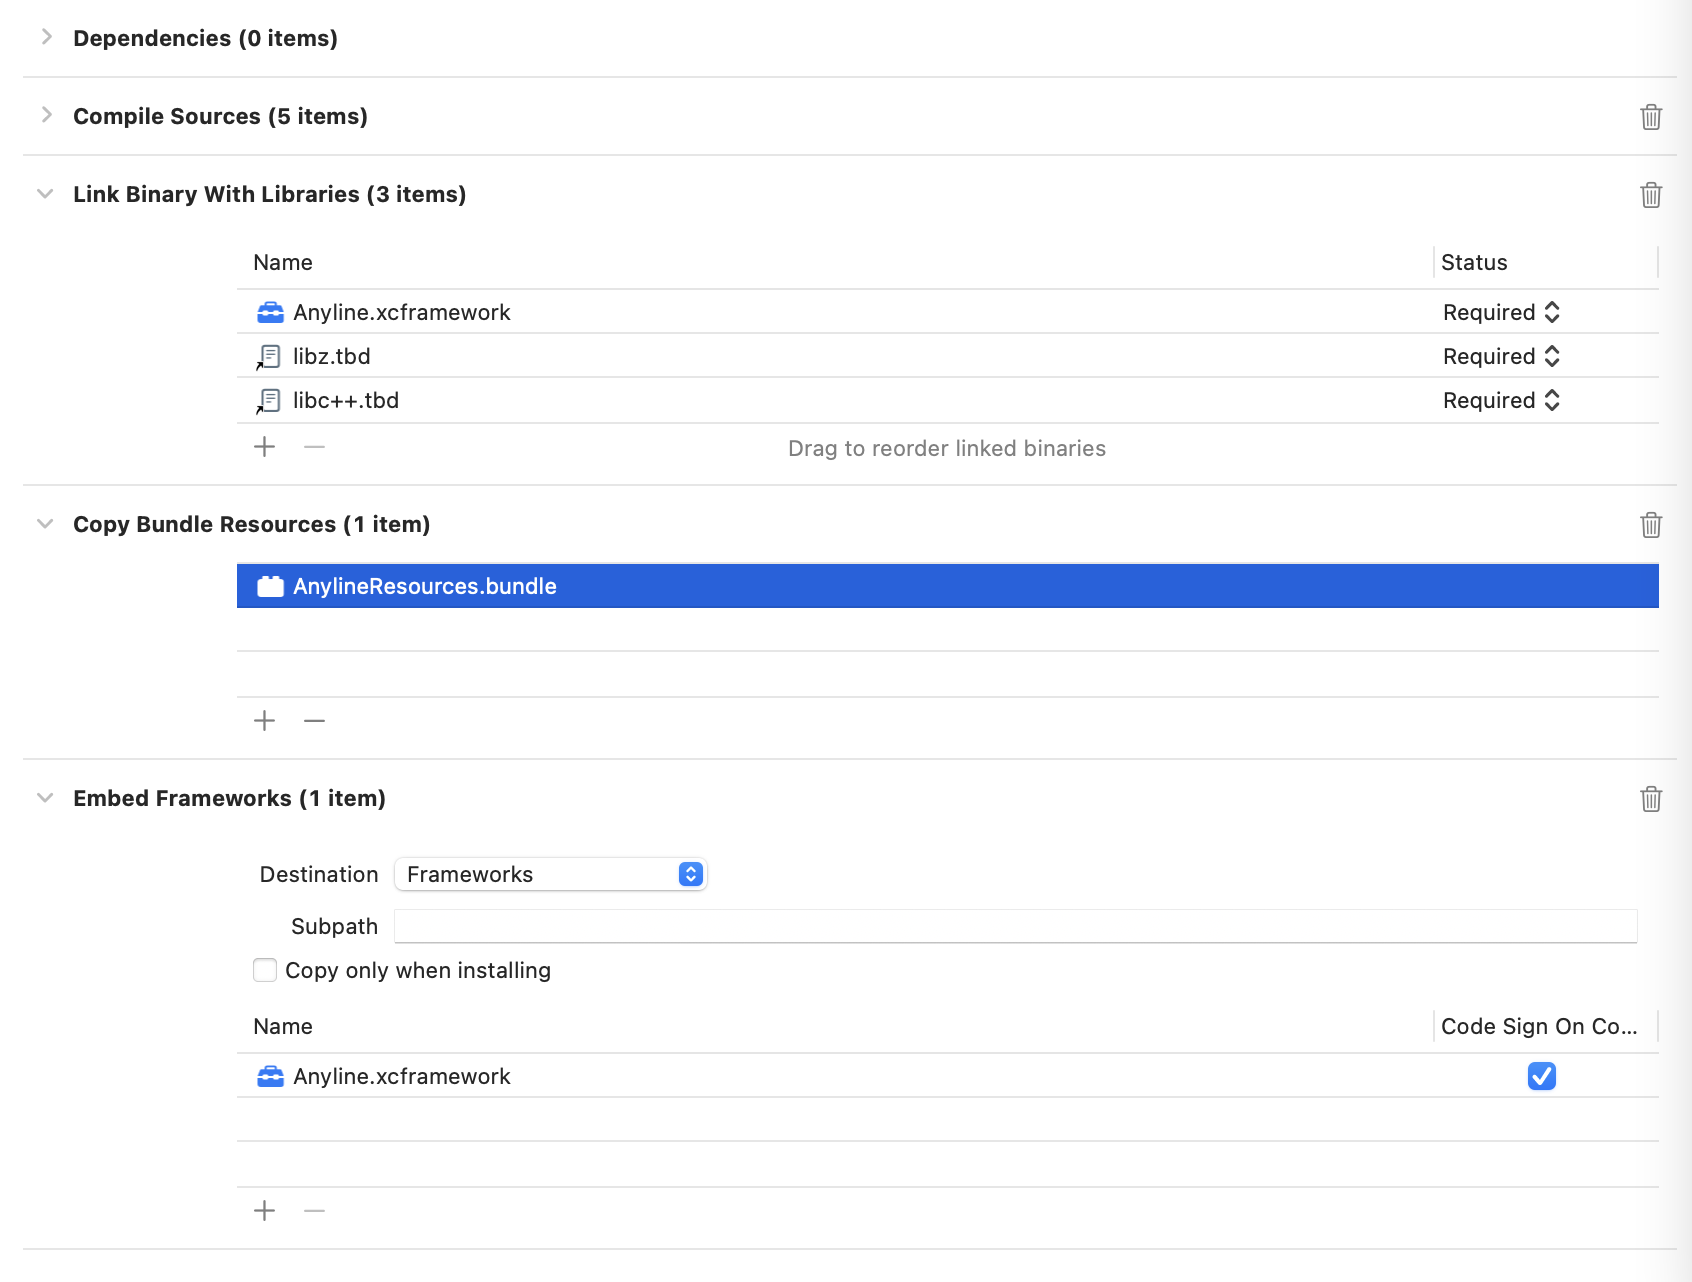
After importing the framework and bundle into your project, go to your application target’s Build Phases tab and see to it that Anyline.framework is included under Link Binary With Libraries, and AnylineResources.bundle is found within Copy Bundle Resources.
Next, locate the Embed Frameworks build phase and drag Anyline.framework from the project navigator into it. Ensure that “Code Sign on Copy” is checked.
| If no Embed Frameworks build phase is found, add a Copy Files phase to the target and set Destination to “Frameworks”. |
After adding the libraries, it should look like this:

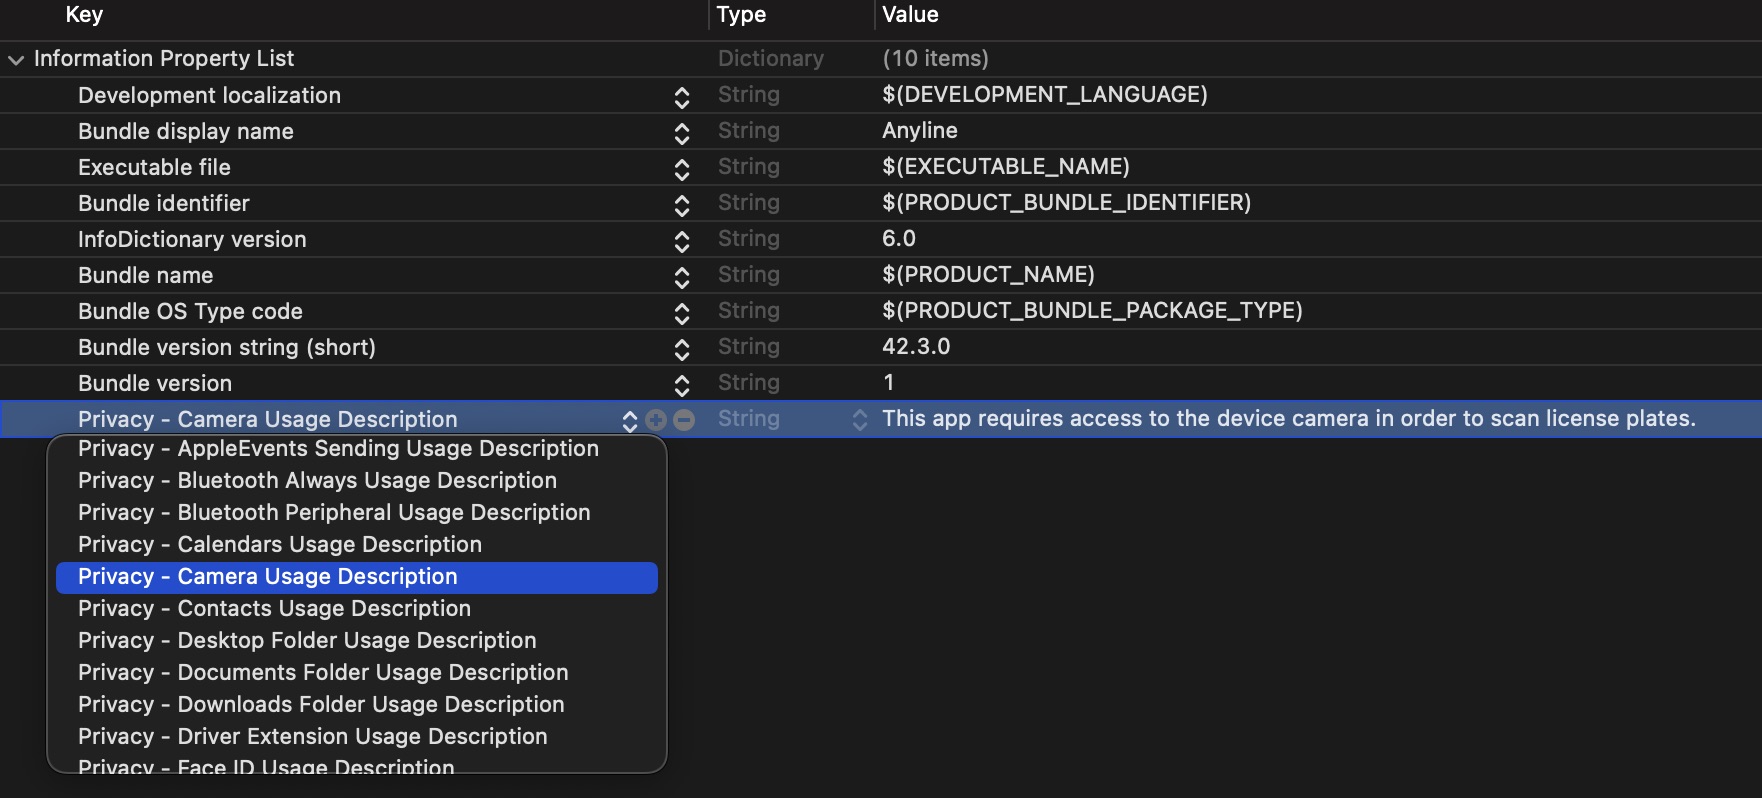
Add a Camera Usage Description to the Info.plist
In order to provide Anyline’s scanning functionality to your application users, iOS requires the user to be informed about a request from the application to the device camera, informing them of the reason why this permission is needed, and giving them a chance to decide whether this access would be granted. The subsequent message displayed should come from you, the app developer, and should ideally explain what this functionality is used for. This confirmation prompt only happens once upon first time usage and the user’s choice is saved (afterwards one can go to the iOS Settings app to change this).
Open the Info.plist file for your application target and make sure that there is an appropriate camera usage message for the key Privacy - Camera Usage Description:
Reduce the SDK file size
By default, the Anyline SDK ships trained models for all of our supported use cases. This will increase your app size significantly, but there is a simple way to remove the assets you do not need. It is advised to follow the steps in Reducing SDK Size.
Integrate the Anyline license into your app
In order to begin using the Anyline SDK on your app, you will need to first initialize it with a license key.
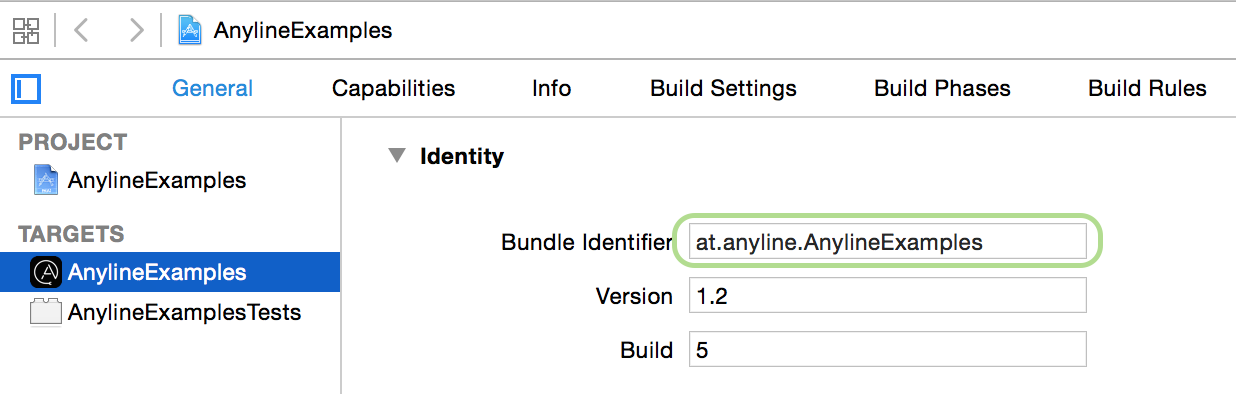
In order to create a license key, you first have to identify the Bundle Identifier of your iOS app.
|
License <> Bundle Identifier
Every license is bound to a Bundle Identifier. If you change your Bundle Identifier, you will require a new license. This also ensures that your license key cannot be used in any other application. |
How to identify the Bundle Identifier
The bundle identifier for your app can be found in Xcode under General > Identity:
| With the Bundle Identifier you are now able to Generate a License. |
Initialize the Anyline SDK
In order to use Anyline in your application, you must first initialize the SDK using the license key string that had been sent to you.First, store the license key in your application code by defining an NSString constant:
-
Swift
-
Objective-C
let anylineLicenseKey = "YOUR KEY"NSString * const kAnylineLicenseKey = @"YOUR KEY";Then, initialize the Anyline SDK using the license key constant once during application startup.
-
Swift
-
Objective-C
import Anyline

let anylineLicenseKey = "YOUR KEY"

// …

do {
    try AnylineSDK.setup(withLicenseKey: anylineLicenseKey)
} catch {
    // Anyline SDK not initialized successfully, check the error
    print("there was an error: \(error)")
}
#import <Anyline/Anyline.h>
// …
NSError *error = nil;
[AnylineSDK setupWithLicenseKey:kAnylineLicenseKey error:&error];
if (error) {
// Anyline SDK not initialized successfully, check the error
}Initialize an Anyline ScanViewPlugin and a ScanView in your View Controller
| Make sure that the Anyline SDK had already been initialized before instantiating a plugin. |
Now you are all set to load one of the Anyline SDK plugins and start scanning.
The plugins on iOS are described in detail at Plugins in the next section.
Questions or need further assistance? Please reach out to the Anyline Support Helpdesk.